Wednesday, April 24, 2013

Way Cool Trim

Our kitchen project is in serious limbo right now while we are waiting for the counters to be installed. It seems to be taking forever for them to call to say they are ready to come home. 

Luckily we are in good shape temporarily.

I thought I would share this cool thing that Hero did to make our new cabinets look a little bit spiffier.


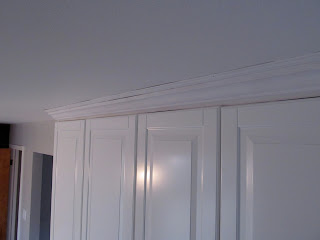
Those upper cabinets can only get so close to the ceiling, and we had this tiny little problem of a slightly uneven ceiling from removing the soffits. You cannot really see it in the photo, but it just looks sloppy. So we needed something to tie those babies in and hide the not so perfect seam.


And Hero came through. By putting two different molding together, we got the height and the width to make it all look like it was meant to be, which it was. 

I'm not sure just how the magic happened out in the garage. Mostly some measuring, some measuring again, some cutting, some eyeballing, some nailing and finally some hauling it in and popping it into place. And then hauling it back out for some adjusting. A few times.

And then it was good.


See how awesome that looks? Usually the middle of projects look worse than they started. This one is not that way.

The cabinet to the right got the same treatment. 

What a difference!


And with the doors you can really appreciate the all together look.

But, we are not quite finished with them yet - They do stick out a little - Not sure why....

Oh, that's right - they need to be painted.


First coat. We used the same color as the ceiling.


Now, no matter how good a paint job we do, this just looks not good. See those seams? They really catch the eye and we do not want that at all. The goal here is for everything to play nice together. We need to give these some attention.


Yep, definitely need to address those gaps.


We just used that handy dandy caulk that we used on the floor trim to fill them in. It is paintable, silicone caulk that is good for all kinds of projects, and it's pretty inexpensive. Definitely worth doing.


So much nicer. 

The new cabinets are making a huge obvious difference in our kitchen. But the little details like trim and no gaping seams makes an important difference, too.

Good way to fill up the limbo time.

Monday, April 15, 2013

I Know a Few of You Are Worried

Thanks for the great comments and compliments on our kitchen overhaul! It is so fun to share our craziness.

Some of you have asked us how we are cooking and washing dishes and stuff. 

Thanks for worrying about us  - But we doing just fine! 

By the end of the first week, Hero had the range, dish washer and fridge (with water and ice!) hooked up so we could get back to at least a somewhat functioning kitchen.

And he threw the old counters on for some temporary work space.

Which leaves an explanation about the sink.


Our previous sink was a double bowl stainless steel sink. It had one of the ugliest and useless faucets when we moved in, so we changed that out pretty quick, figuring that with the renovation, we could just change it out to the new sink.

Our new sink, that comes when the counter top is installed in a few weeks, is a single bowl. The actual footprint of the new sink is only a smidge smaller than the old sink's two bowls, so we are excited for all the roomy sink action in our future.

But that new one is still in the future. 

Soooooo,

Hero took care of us, as usual.


Look at that!

We are totally set.


I'm not sure what Hero likes more - using cool steel cutting tools or making this work.


But see that jaggedy edge - Um, good thing we have an ER nurse in the family.


That is definitely not a good situation. 

But as usual (again), Hero is all over this:


Duct tape.

And it totally matches, like it was meant to be.


He covered those edges like none other and we are safe and looking good!


Once the water was hooked up, we discovered a little, tiny problem.

When the sink got booted outside during the demo, the water that was still in the faucet froze.

And broke our faucet.

Rats.


But, as usual (seeing a trend here?), Hero was not about to leave us without water. First he tried attaching the sprayer head to the regular faucet.

A good look, but not successful.

A valiant effort, though.


Next he attached the faucet head to the sprayer - It totally worked!

He just used some more of that handy duct tape to keep it in place when the water was turned on - otherwise we would have that hose flopping all over spraying water everywhere.

Now we also are getting a new faucet. 

I don't think this set up is going to translate very well to the new sink.


See that open space to the left of the remaining sink bowl? 

That is right over our trash can. Kind of handy.

See how good we're doing here?


Friday, April 12, 2013

Here Is What Happened Next

Part of the fun of this particular kitchen project is actually building the cabinets. 

We are pretty darn excited about these IKEA cabinets, and they really were a piece of cake to put together.


No matter what these faces are telling you.


The living room became the crazy assembly and holding room for the cabinets. We had eleven cabinets to build, including a lower drawer unit, and a lazy Susan corner lower unit.


This is one of the shelves of the lazy Susan unit. Liam cursed this particular cabinet up and down. I think he may refuse to use this cabinet.


He even followed the directions - Or at least the little IKEA man drawings.


But he did prevail, and it works terrifically!


With 3+ layers of floor in this kitchen, there were about a million staples and nails that needed to be pulled out before the cabinets could be put in.


Not sure what Colin is thinking here, but probably something like, "I just looooove this super fun project that I somehow get sucked into."


That's what Liam is thinking.


And I'm pretty sure that is what Hero is thinking, too.

IKEA cabinets come to fit a perfect kitchen. We have a less than perfect kitchen.
Something about plumbing pipes we have to work around. I don't know.
Hero had to rig a few to make them work for us. He is so good at rigging.


See how nice our floor is going to look with these new cabinets?
Oh, wait, those are going, too. Just not quite yet.


This neat rack is installed first onto the wall, into studs, and then the cabinets are mounted onto that. It is really cool - makes it easy to just throw those things up there.


See?

See that little box in the upper right corner of the upper cabinet over there by the window? Yep, another little creation by Hero. There is a pipe there (really?) that we had to install around. Hero made a little cover for it. I will paint that white and it will blend right in.


Hey Mr. Cabinet Man!


Oh boy - Look at how terrific this is looking! Even with so much more to do still, it looks so great.


Putting the doors on is like being practically finished, right?


We are so excited about this drawer base unit. It has the big drawers for all kinds of treasure.

I'm going to hide flour and sugar and such in there.


Look at that! Hero made this awesome trim to go to the ceiling to make the cabinets look built in, and to hide the patched ceiling leftover from the soffits. Wait till you see how the turn out!


Lunch break. It's hard having no kitchen, but we made it work.


Check out that all new cabinet area - All brand new storage for this kitchen.


And look what we did to it!


Thursday, April 4, 2013

The Demo

Here is how I left our kitchen on Monday morning:


Before I left for work, I emptied out some of the cabinets. I then spent eight hours at work and came home to this:


Yay!

Here is what happened during the day:


The room got quarantined.


The appliances got out of town.


Lots of axes got swung around by teenage boys. 


There was lots of sledge hammer action.


Cabinets and pieces were coaxed from their long time homes.


Lots of fun bouncing on the shelves.


Someone got to use this awesome saw.


Discoveries were made.


Lots of nastiness fell from the new giant holes in the ceiling.


Holy cow.


Giant holes were covered up.


And even the back yard got some attention.

Along the way, more history of our little home revealed itself. Here are just a few ways:


Wallpaper. 

We actually discovered three different wallpapers with this project, which make a total of five different wallpapers for the kitchen.


Floors. 

Three different layers of floor here, but we know there was carpet at one time as well.


And the pipes.

Oh yuck. 

Remember when we got new plumbing? These pipes are not a whole lot better. We cleaned these babies out.


Things are moving along swimmingly!