Wednesday, August 29, 2012

Let There Be (Cute) Light

In case you have never tried, light fixtures do not photograph well when they are turned on.

Just a little update on the light going downstairs. Here is what we started with:


Nice, huh? 

I am pretty sure this is an updated fixture. As in, an improvement from what was there before. If you use your imagination, you can see this being used in the seventies with a little success.

It did the job (sort of) of illuminating the stairs, but not very attractive at all. When painting, I was none too careful, cause I knew it was coming down.


And here is the $15 beauty from Lowe's. 

What a difference - and it is much brighter, too. 

Little things like a light fixture make a big difference. The area feels pretty complete now.

Well, except for the not so attractive flooring. That is a project in conjunction with the kitchen floor, which we will get to probably after the holidays.

To see the rest of the basement stairs revival, check here.

Tuesday, August 21, 2012

Picture Art

I have this thing for old wooden windows.

Not sure how or why, but I seriously just love them.

My first old wooden window set me back three dollars at a garage sale. That is the most I have ever paid for one.

I found these beauties in someone's trash pile a few years back. I scrubbed them and hung them on the wall. They were perfect for working with a tall wall created by the vaulted ceiling in our bedroom at the big house


(Disregard the blue tape. Got excited about the project. I tend to forget to take before pictures.)

But here is a close up. I thought when I first discovered them I would paint them, but I kind of like them the way they were - Lots of history.


At the big house, I copied an idea from Pottery Barn, using big frames with a center picture, and some cutie hand-picked photos of the kids surrounding the center. PB used a super expensive frame and fancy mat - I used thrift store frames, painted black, and white poster board. 

I totally loved them.


But there is not room at the small house for them. That means a project.

Yay!

So, I created a new history. I painted the window frames.

That blue tape comes in handy.


I used a color a little bluer than the gray on the walls, left some of the past paint to show through and gave these babies a whole new look.


Just what I wanted! I love, love them. Again, not sure what draws me to them - The history? The symmetry? The price? Who knows. 


They would have worked plain, but here is the end result - A new way to show off my kiddos. Each one gets 2 panes. 


I have a little stash of old windows for upcoming projects - Another collection of mine.

I just love them.

Tuesday, August 14, 2012

The Stairs


The person who owned our little home before us tried to make most of the house neutral. It was his goal to buy cheap, put in a little money and work and then flip it for a profit. 

But for most of the house, all he succeeded in doing was making the house pretty drab.

But not the stairwell to the basement!

Just look at this lovely space. Really, all that pattern in one small space was more than drab. 

Not sure what though.


Patterned wallpaper and that lovely linoleum floor that is also in our kitchen. It was a good idea to hold onto that handrail - It made you feel a little loopy just walking through.


See on the back wall? The brown stripe? That is the thinnest piece of molding that has ever been available. It actually went all the way around, fortunately keeping the wallpaper from going all the way up to the ceiling.

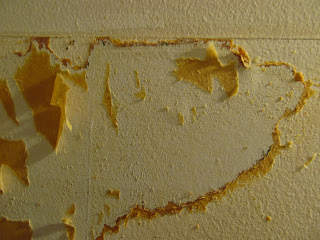
The yellowy strips that are torn off are the result of just walking by, grabbing a little corner and seeing how far you could tear off. I figured each strip off would mean less work later. 

What I did not realize was that under that layer of wallpaper was another layer of wallpaper.

Um. First, who wallpapers the stairwell, and second, who wallpapers it again?

I know the answer to the first. Hero's mom. She did the whole kitchen with the wallpaper. But it was the late 50s and that was very trendy. The second? Not sure, but after scraping these walls, I can see where someone just might be tempted to wallpaper over wallpaper.

But not me.


See those little pieces? This is a great project for someone with OCD issues. You just want to grab those little things a peel away.

The funny thing was, the first layer of wallpaper was painted over, too. This stairwell sure got a lot of attention.


First wall almost clean!

The best way to remove wallpaper is a spray bottle of water, a scraper and boat loads of patience. Seriously. Just spray the heck out of that wallpaper, let it soak in for minutes (really) and then scrape. If you start scraping too soon, you only get little bits. If you are patient and spray every time you want to scrape for at least 5 minutes, you will get nice long, very satisfying strips.


Evidence of my patience - Big pieces.


All clean! Horray! 

A quick wipe down of the wall and we are good to paint.


I taped a paint brush to a pole, got busy with the Bristol White (Valspar from Lowes) and painted the actual wall (not wallpaper).


Look how glorious and clean and white and wallpaper free! 

I can hardly wait for paint to dry and I am ready to accessorize. It may be a problem. 

But, really, all those hours in the stairwell spraying, scraping, wiping and painting - I had lots of time to make my plan.


Hero on the job. Always ready to help with whatever I have cooked up.


I wanted to hang stuff on the stairwell - Apron, broom, etc. I searched high and low for a good hook rack, but did not find what I wanted for cheap enough.

Genius idea moment - I remembered this green board that Hero and I made a long time ago for another project. I had not seen it since we moved to the small house, but Hero had it in the garage, just waiting to be loved again.

It was perfect! And free! Even more perfect!


This space is sooooo much better. And functional. The little kitchen needed help from this area. 

This space has gotten on board with the neutral plan, but not the drab plan. No wallpaper needed.

It is little things like this that are making this house our little home.

Tuesday, August 7, 2012

Kitchen Window

This project was one of those kind of projects.

The kind that you know will bring fabulous results, but for one reason or another it falls farther down the list. And then something happens to move it to the top.

This is window in our eat-in kitchen. It is a great, big Andersen window that probably cost more than all the other windows in our little house combined. It is solid - we totally walk on it as needed (usually there is a table in there.)


But there were two big problems with it. 

First, the faux-wood blinds. When they were extended all the way down, they did not cover the whole window. This is a west facing window, so we need that coverage for at least a few hours everyday during the hot months. And when they were cinched all the way up, they hid about 10 inches of the window.

Um. Who's idea was that?

Oh, and the lovely sound these things choked out when raising them - worse than nails on a chalkboard, worse than a screeching kid, worse than opening up an ironing board.

You get the idea.

The second big problem was this -

We do not love the wood frame.

I know some love wood trim. We do not. Especially since the rest of the entire house has windows with white trim. (And all the doors and all the floor moldings. This space is not playing nice yet. But it will.)

Then we had a catastrophe.


The min-blind broke. Oh, this is sad. This is a problem. What will we do?

Rejoice! 

I got online immediately to order new roller shades (the same ones that we got for the bedrooms) and got to work getting those blinds out of our house. Trust me when I tell you that the window looked better already.


I got the Kilz out and got that window covered in glorious white. With just one coat of primer that was streaky and flat, I am sure that even all the neighbors could here the angels singing. It looked that good.


Holy cow! It is wonderful! It even makes the back yard look better. And it feels like the outside is coming in. 

So, so great.


And see those fancy stripes on our shades? (Which, by the way, do go all the way down.) They did not come that way. That is my doing.

While I was out of town for a few days, the shades arrived to their new home. And Hero, being the hero that he is, put them right up to surprise me. 

But he did not realize I was not quite finished painting - Just needed to do a few touch ups, including right above the shades. 

Rats. I thought I was being so careful. 

But, I have a plan for them. 

It is on the list, not too far down. Hopefully it does not become one of those projects.