Tuesday, June 10, 2014

book review

Have you heard of this book?


I really like this book!

I find myself getting tired of companies telling me what I should like, what I should buy, what I need to be successful and how I should live. Do you ever feel that way?

In down sizing our home, we kind of went against the "American Dream" norm. But we are loving having less mortgage, less stuff to maintain, less stuff to clean, more time for things we would rather do (Yes - some of those things are remodeling this small house - But we like doing that!), more opportunities for serving, and more time for people. 

I love learning about the world we live in.

Before we bought the small house, we were already on our way to minimizing. We just had way too much stuff! All that stuff really weighed us down, with no joy attached to it. That is no fun at all.

Even now, we try hard not to keep buying more stuff, and we regularly reevaluate what we decide to keep. Of course, we are still purchasing things. Of course, we keep things we really have no need for (and we don't love it either). And of course, this sometimes makes me crazy.

But being aware of purchases helps a ton! And that's where this book comes in. I learned so much about how we are encouraged, enticed and tricked into buying stuff. Knowing how that works makes it so much easier to buy the things you want or need and ignore the rest. You get to shop on purpose and not get suckered into buying stuff you never intended, just because someone else wants your money.

It's a fun book to read - easy and funny and really good eye-opening information. You should totally read it!

Oh, I would loan you mine, but I borrowed it from the library.

signature photo teresasig1.png

Tuesday, June 3, 2014

back yard

I like having a back yard. Really I do. 

But I really do not like yard work. Not in the yard either for that matter.

I know some people love it. My next door neighbor is one of those people. She is working on her yard all. the. time. And her yard is beautiful, with lush green grass, colorful flowers and fun yard art in the design on critters, flags and light up things (which our grandson Jett just loves).

The following is not anything like our neighbor's yard. Just sayin.

There is so much to do in this yard, it is crazy. Let me show you -


This is along the back fence. These bushes were most likely planted around 1960 by Hero's parents. They have lived a long a fruitful life. But their age has been starting to show for a while now.

And the grass weeds. Just lovely. 

There is actually grass in most of the yard, just not here. Even if it is green, do not be fooled.


Looking at the south/west corner. First, more bushes, with a few bare spots. (Hero actually transplanted one of the smaller bushes removed along the back to this spot. Here's hoping it lives.) This line of bushes is actually in pretty good shape, so they will stay. They just need a little trimming.

And then there is the shed. This has to be the ugliest shed on the planet. Ugh. It is one of old those sheet metal situations with the awful squeaky doors when they are slid open. And to top it off, this thing sits on a plywood floor - No foundation. Last year Hero had to tilt the thing on it's side because he saw a possum run behind it. Yikes! He got the whole thing cleaned out and secured it the best he could without pouring cement. Seriously, every time I had to get something out of the shed, I would kick the side to make sure nothing jumped out at me.


Hero tied a come-along to this evergreen and pulled all the bushes out one by one. Fortunately, even those things were like a million years old, they didn't have very deep root balls. They popped right out. 

(For the record, I say they came right out, because Hero did all this while I was at work. I came home and they were all laying on the ground. Easy!)


See the roots? No big deal. (And there is some of our grass!)


Looking toward the northwest corner. A long line of no bushes. Yay!

Oh, wait. There is one bush left. Hero left it there because it is different than all the rest. It has little pink flowers on it. Hero wanted to save it in case we could use it somewhere else. We couldn't, so it also got pulled.


When I got home, I helped out in a very important way. I got Hero a Slurpee. Boy, was I needing a break after that.


We weren't entirely sure what size arborvitaes we were going to plant along the back as we didn't want to spend a ton on them, but we didn't want little tiny twigs. But, I found these 2 footers for $3! We needed 17 of them, so we saved a bunch over the next price range we were looking at that were around $10-12 each.

So we are good with small. They will grow.


Another lovely shot of our shed. Ugh. Even looking at the photos, I get a little shaky.


And here is the new shed. Oh, it so glorious and not metal and not on icky old plywood and not squeaky and loud and not ugly. And not hiding any critters.

Looks like we might be on our way to having a yard like the neighbors.

Or not so much. But it is a big improvement already.

signature photo teresasig1.png

Wednesday, May 28, 2014

growing a little

Things are changing and growing all over.

Change and growth can be hard! But it's usually a good thing.

I showed you our little plants and my very own basil planted from seed (that is still alive and getting bigger). That basil is big enough to be in a real pot - I am so excited! I'll show it off soon.

Our family is growing - Lauren and David had their sweet little baby Max at the end of April:


Oh. My. Goodness. So dang cute.

As much as we have done on our small house, the list of projects keeps growing. Does that happen to you, too?

Now that it's spring, our grass is growing. And the weeds, too. Darn it.

Colin is graduating in a few days. His life is really changing as he gets ready to leave home for school. And we will be down by one at the small house.


But something else is changing and growing, too. My ideas for this blog.

I really love having this tiny spot in the world to share my love of decorating and the adventure we have had downsizing from a house twice the size. (And I love your comments and input!) I've thrown in a few posts about non-house stuff, too (Macaroons anyone? Or how about a fake marquee letter?) 

I want to keep posting about our house projects, hoping to inspire you to tackle your own projects. And I also want to include other things that round our our lives - we have more than a house going on.

So, I'm excited to make some changes around here.

You see, one of the great things about having a small house and less stuff is having the time and energy for other loves.

And I have lots of good things that I want to share. Like:

Organizing - I've done a few posts (here and here), but I would like to expand to respond to specific areas I've been asked about.

Minimizing - You know we are working on that a lot since we bought the small house. And we have been working on keeping only the things we really love and/or use. Sometimes, I am really inspired by people who have so few possessions, they can fit them all in a suitcase. I do not want to do that - Yikes! - but the idea of it encourages me to really take a look around. I love the lighter feeling of less stuff to take care of.

Decorating - Love this! And I would love to feature other's decorating style, too.

Other Decorating - What? I'm talking about special stuff - Parties, holidays, weddings (In fact I have a wedding coming up soon!)

Crafty Things - I have about a million pins of very clever ideas. We can do pin challenges (Make something you've pinned and share - Great motivation!)

Hand Lettering - Speaking of pins, if you follow me on Pinterest, you may have noticed I have pinned another million (I have lots of pins.) lettering/font/lay out ideas. I have always loved graphic design, and have ventured into the charming art of hand lettering. It has been so much fun! I get lost in time with my pens and paper.

And I may throw in a few personal things occasionally - after all, my family is one of my first loves!

So with changes, I am excited to design a new look for the blog. I have been working on the new header and hope to have things together in the next couple of weeks.


After sampling several fonts, Hero and I both agreed that this sassy font could be lots of fun. 

What do you think? Which layout do you like best?

signature photo teresasig1.png

Wednesday, May 14, 2014

Front

Remember this photo?


This is the photo we posted two years ago of our then new to us house. With the rays of sunshine behind it and a cool filter, it looked pretty good.

And it is a good little house. We have not regretted trading down from the big house once. We have learned so much here (PEX anyone?) and found we can live with a lot less stuff. We have installed our first IKEA kitchen and got our basement in shape.

It's been a great little house.

But we have got to do something with the front. It is not all that super fabulous.


We had some odd bush situations going on - two round ball bushes and some really creepy creeper kind of bush. And if you look close, you can see in the upper left corner some really effective and attractive gutter action going on.

Oh, and the white address sign has been there since Hero's family lived here. 


The garage is not too bad - but the little eagles above the doors, which have most likely been there since the 70's, are not quite our style.


Two more random ball bushes. And a lily that seems to thrive on neglect (My kind of plant).

With all the happenings inside the house we have put the exterior on the back burner, but it is most definitely time to get on a few things to help improve the view. 

We have managed a few updates outside, including painting the front door and yanking out a few unfortunate looking bushes. 

We have plans this summer for a graduation party, so the outside has become more a priority. Here are a few items that are on the list:

1. Level the backyard. This includes bringing in some dirt followed up by laying sod. There was once an in-ground pool back there - now it is filled in. It is super lumpy. 

2. Get the veggie garden planted.

3. Do a little bit of landscaping. We want to keep things low-key, so nothing high maintenance for our yard.

4. We have a very sad evergreen tree in our back yard that really needs to come down. We are totally stalling on it though. It is home to squirrels and birds and it is alive. Plus it offers some privacy. But it is too tall and starting to compromise the wires. It was trimmed once - trimmed meaning someone lopped off the top. Hence the sad appearance.

5. Remove the most unattractive shed in existence. It is so awful. It is an old metal thing with squeaky sliding doors. Cannot wait until that is out of here.

6. Build a new smaller shed in a better location.

We have lots going on so it is taking a while to get a big push going. And all the rain we have had is not helping. But it has to happen soon.

We need to get this outside looking as fabulous as the inside.

Wednesday, April 16, 2014

things are growing here

First, thank you for your great comments and compliments! I love to hear that you read our little blog. 

Lots of you are asking what we have going on next. Here are a few things on the list coming up:

Getting a new fridge. (Yep.)
Painting and perking up the basement bath. (We do have a half bath down there.)
Maybe doing a bit more cosmetic work in the blue bathroom. (Grout and vanity, I'm looking at you.)
Having a garage sale, which means some more purging. (Alex and I are doing this together. Otherwise I would just donate everything that needs a new home.)
Food storage area needs some organizing. (It's pretty good now, just some tweaking is in order.)

And the outside.

This is a biggie. I'll let you in on it soon.

But part of the outside plan is expanding our garden. I must tell you that I have nothing to do with this. I kill plants. I want to love them and be their best friend, but I end up forgetting about them for months. 

Not good.

Fortunately, Hero is all over this. He took over my seriously pathetic attempts at trying to grow a few tomatoes last year, and we have all been much happier since. We bought a few plants, dug out an area for planting, plopped them in the ground, watered them, weeded them and harvested them. 

And when I say "we" I mean Hero. Except for the harvesting part. I am happy to walk out my back door and pick fresh vegetables for dinner.


Things progressed this year to a new level - Seeds!

Hero got this awesome 72 spot seed growing kit and spent some time fluffing dirt and planting little tiny seeds. So much hope in a seed!


He planted a few varieties tomatoes, peppers, cucumbers, beans, cantaloupe, and something else, I'm sure. He has a little map, kind of like a box of chocolate that comes with a guide of what goes where, to sort things out. Which is good, because when they first sprout, they all look the same.


Some of those seeds are tiny!


And look what happens after just a few days! 


Those big ones are cucumbers, by the way.

This is mine. I found a little greenhouse kit for growing basil at the dollar spot at Target. 

I invested one dollar into the future.

This actually looks pretty good. The first one that sprouted got mold on it and it keeled over after just a few days. Dang it.


Holy cow - Look at that! There is all kinds of action going on now. Lots of things sprouting all over the place.

And a few duds. Dang it.


Even my basil is still living.

It really doesn't look much like basil yet. Or smell like it. But I am optimistic.


If I can keep it alive.

signature photo teresasig1.png

Tuesday, March 25, 2014

basement

I love when people ask me what our next project is! We are having a great time turning this small house into a great home that feels more like "us". Your interest and comments are very much appreciated.

 Thanks for reading our little blog!

We have a few things planned for the spring - Hello brown and beige trim/siding/gutters outside! - but for now we are getting to a few things that won't break our bank.

First up is our basement.

Once the stairs got their beauty treatment, the rest of the basement was looking and feeling a little drab and unloved. 


Yep. Drab and unloved. 

We have cleaned and straightened and organized it a few times since the great move in dump, but it is needing some real attention now.

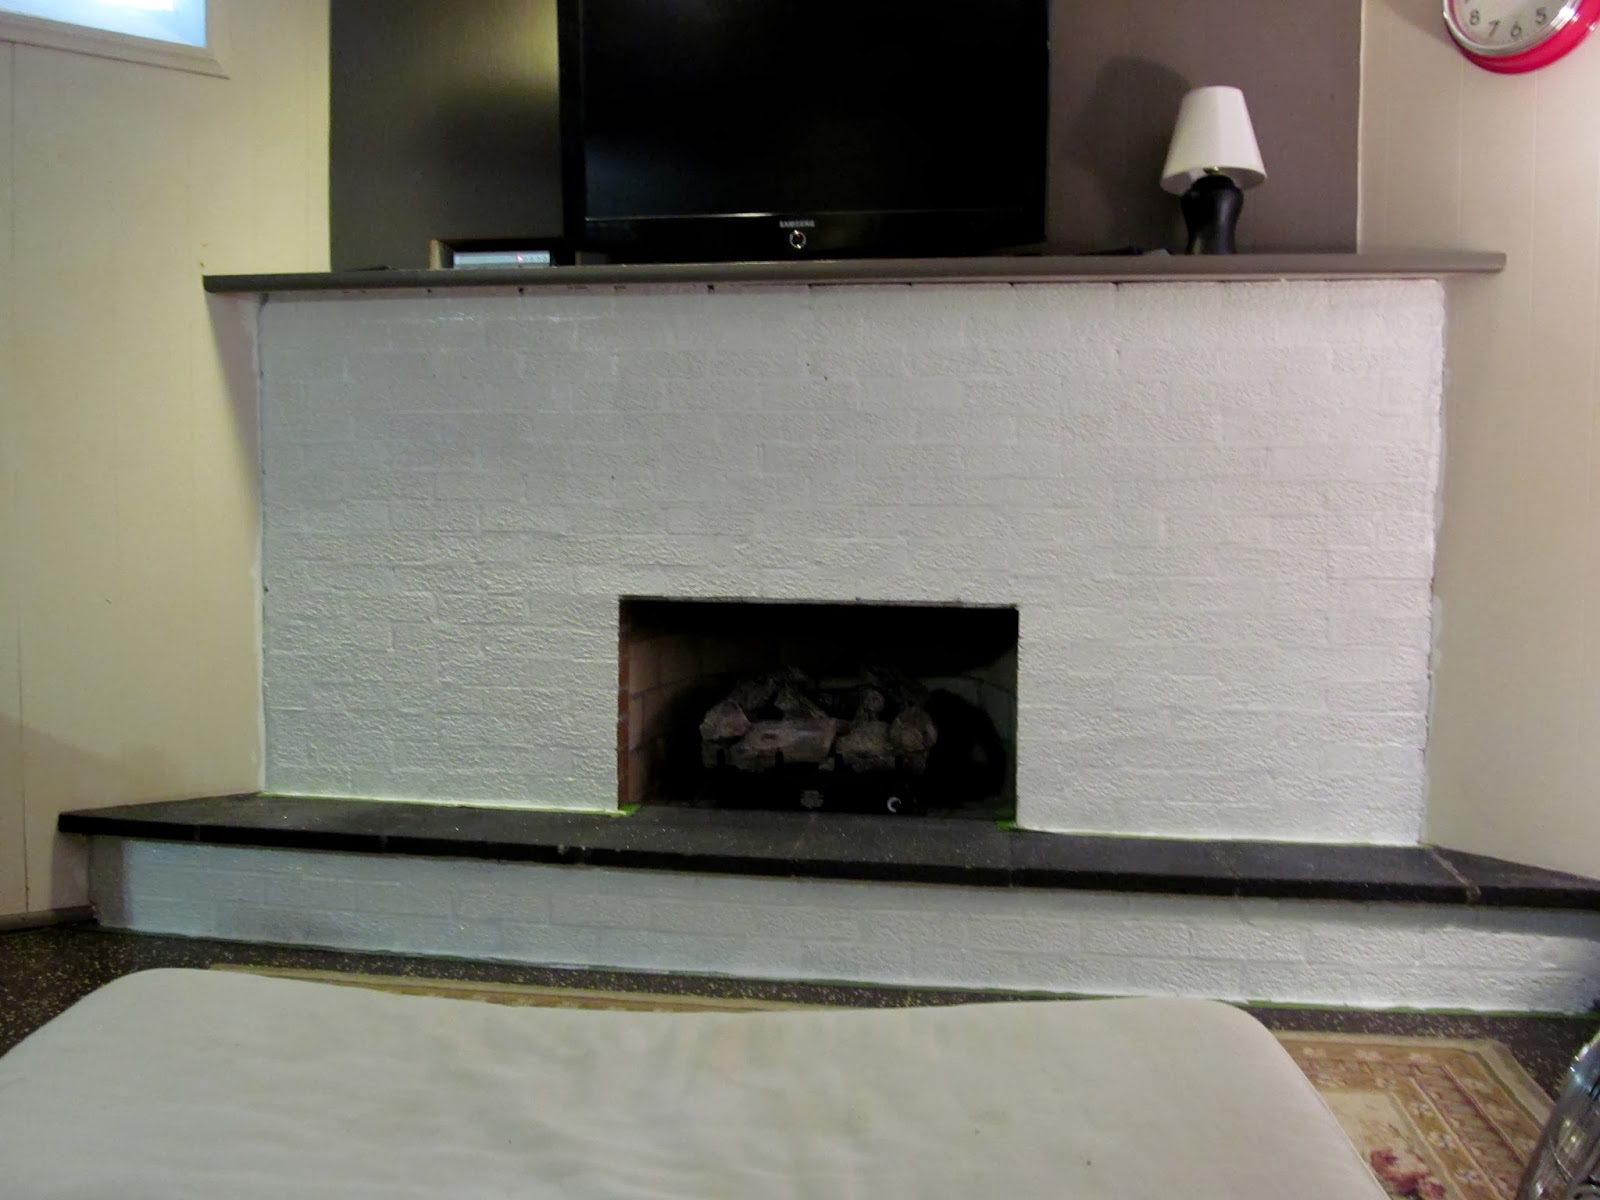
The first thing that needed to be undrabbed, was the corner fireplace.

We debated for a while what to do with it - white wash the brick, paint the brick a fun color, paint the mantle and upper wall a fun color.... You get the idea.

We did not love this color at all. 


We wanted to make the basement as light as possible. As is the case with most basements, we have only a few small windows for natural light. The bricks were light sucking. 

That revelation helped us decide that we wanted to cover them completely.


So out came the Kilz. It is recommended to use primer first if there is any staining from soot. We didn't want anything messing up our lovely paint job, least of all show-through black soot.


It covered like a champ. Yay!

But man was this stuff stinky! It is hard to ventilate in a basement. Even though this is a product for indoor use, it is potent. We had the little tiny window open with fans going and we still could smell it for a few days after. Fortunately one coat was enough.


Oh - So much better looking already!


The whole space feels lighter already.


After the primer dried for a week, we were so ready to get the rest of the basement brightened up. 


Part of brightening up the place, Hero tackled an unexpected (on my part) job with the existing lighting. 

For whatever reason, there was a recessed light in a super awkward spot right in front of the fireplace wall. Not only was it thisclose to the TV, but it looked like a 6 1/2 watt bulb, it was so hidden up in the ceiling. (Take my word for it.) So Hero moved it to a better location and replaced it (and it's brother) with a much more efficient recessed light. Sorry, no photo of those.  But they are just like the ones in our kitchen.)

The problem I was in charge of fixing is how to patch the hole. 

Ugh.

I'm not a huge fan of the textured ceiling, but it is what we were working with. It actually wasn't as hard as I thought it would be. Once I gave up on the idea that it would match perfectly, I was free to be creative with the plaster patch stuff. 


It actually didn't turn out too bad. 

Good. Moving on.


See the gray spot on the ceiling just above Hero's right hand? That is the patched area. Once everything was painted it blended in just fine.

We decided to paint the entire place the same color. The fireplace, the ceiling, the walls and the trim. It is Bistro White (Valspar) and is the same color as the trim and ceilings in the rest of the house. 

We did flat for the ceiling, satin for the walls and fireplace and semi-gloss for the trim.

(You can see the old color on the right of the fireplace. Not the worst ever, but compared to the clean white, so drab. Not sure why we waited until actually painting that wall to take the clock down though.)


Between Hero and I, we had two trays going at all times. He usually does ceiling and I usually do trim. And we share the walls. We just kept rotating what we were doing and switching up trays, rollers and brushes. Amazingly we did not get anything mixed up.


We love it! It all looks so clean and bright. With everything the same color, the space really opens up. We needed that since there are so many different things going on - three slightly different ceiling heights, corner fireplace and a post right in the middle of the room.

After we got done painting, I swept and mopped and dusted. I washed the slipcovers on the couches. I sewed a few new pillow covers. I edited out some things and accessorized. We actually have stuff up on the walls, too, to make it feel much more "Murphy". 

Not too much stuff though.


Before.


And after.

We spend a lot more time down here now. It is so cozy with the fireplace - Hero hooked up the gas and it warms up so nice. And the couches are so comfy for snuggling and taking little naps.

For the cost of some paint and a few lights, we are really happy with the way our basement got a new look.

signature photo teresasig1.png

Thursday, March 6, 2014

armoire

A few months ago I got a group email from a friend who was trying to find a new home for a TV cabinet their family didn't want anymore. I immediately thought my daughter would like it. (Remember she and her family just moved to Michigan). She gave me the go-ahead to claim it for her.

And then she decided that she really didn't think she could use it.

I didn't think I wanted it, because, you know, we are getting rid of stuff, not accumulating stuff. But the more I thought about it, the more I realized this cabinet could be just what we need to replace the cheap, open bookshelves we have had forever. (Not that there is anything wrong with cheap, open bookshelves. Ours were just looking super worn and sad. And very old.)

Once we got it home I realized this was going to be perfect!


Our friend made this while he was in high school. It is oak and heavy and really well constructed. 

Holy cow. We had him autograph the back - He may be famous some day. 


Such a great armoire!


I have always wanted an old armoire. They are so versatile and full charm.

This thing is deep. Remember when TVs were huge and you needed a big furniture to fit them? Luckily, I didn't want to use it for a big old TV.

But, it needed just a little tiny bit of help to make this a little more "us".


First up - a layer of paint. 

The stained oak with brass handles was very popular and such a great look for the 80s and 90s. I probably would have loved it then, too. But I want to make it look like it's been around a lot longer than that.


After one coat.


And the second coat.

See the edge of the bookshelf on the left there? Sorry I didn't take a full on photo. You will just have to believe me that they are a wreck.


Looks so different already! I just love painted furniture.


And, now it's a different color.

I got this great color at Lowe's. I tried to get a sample photo of it, but I could not figure out how to get just a photo of the color. 

But you can see it is a muted blue-gray color that I thought would be pretty terrific. And it is.

I wanted it to look like it's been painted several time over the years. So that is why I did the two coats of white first, and then the two coats of the blue-gray. I could have gotten really crazy and done even more, but I was getting a little too anxious to put this thing to work.

I actually made this color into chalk paint, following this tutorial.


Chalk paint finish is very matte, which means it has no shine at all. In fact, it almost looks powdery. It is such a cool finish for something that you are trying to make worn and loved. And it distresses really well. If you want to sand the edges and scuff something up a little to make it looked a little bit aged, this is a great paint for that. Straight latex paint sometimes peels instead of sanding off in a more natural looking way.


Can you see that edge there? See the white paint peeking out a little? Just what I wanted.

Another great thing about distressing a piece, besides the awesome patina you can get, is that you don't have to worry about future scuffs and scratches. Any natural wear just adds to the charm!


Got the doors and drawer fronts all painted up, too.

(Another accidental shot of the book shelves that will soon be in a garage sale.)


I dropped this door while prepping it. See the little crack at the joint? The door is put together so well that it didn't even loosen, but it did add a little character when the paint cracked. So glad I don't have to freak out about that imperfection. In fact, I like how that happened.


When using chalk paint, a wax rub is a great idea to get a protective coat. This wax is clear, but there are darker ones that looks like a light stain that also add a cool subtle, antique-y look.


But here's how the clear looks. Just brings out the color a little, kind of like when a plain rock looks a little fancier when it gets wet.


You just swirl the wax around with a rag, and then buff it with a soft cloth. Piece of cake.


The one on the left is waxed. See the difference? It's nice and subtle. 


You can see how the light reflects off the waxed finish. The wax makes it look done.


Hero cut a board for one more shelf. Clearly not the same caliber of wood - oak versus particle board.  But since I am painting it and putting it behind closed doors, it works just fine for us.


Something else that really helps in creating a different look is new hardware. I found these awesome knobs at Hobby Lobby - 50% off, of course.

(I kept the same hinges - just painted right over them. No big deal.)


All done. I love it! 


Looks really different now


And it holds a ton. I got everything in plus a little more. 

We love it.

Thanks Matt and Stacie.

signature photo teresasig1.png