Showing posts with label basement. Show all posts

Tuesday, March 25, 2014

basement

I love when people ask me what our next project is! We are having a great time turning this small house into a great home that feels more like "us". Your interest and comments are very much appreciated.

 Thanks for reading our little blog!

We have a few things planned for the spring - Hello brown and beige trim/siding/gutters outside! - but for now we are getting to a few things that won't break our bank.

First up is our basement.

Once the stairs got their beauty treatment, the rest of the basement was looking and feeling a little drab and unloved. 


Yep. Drab and unloved. 

We have cleaned and straightened and organized it a few times since the great move in dump, but it is needing some real attention now.

The first thing that needed to be undrabbed, was the corner fireplace.

We debated for a while what to do with it - white wash the brick, paint the brick a fun color, paint the mantle and upper wall a fun color.... You get the idea.

We did not love this color at all. 


We wanted to make the basement as light as possible. As is the case with most basements, we have only a few small windows for natural light. The bricks were light sucking. 

That revelation helped us decide that we wanted to cover them completely.


So out came the Kilz. It is recommended to use primer first if there is any staining from soot. We didn't want anything messing up our lovely paint job, least of all show-through black soot.


It covered like a champ. Yay!

But man was this stuff stinky! It is hard to ventilate in a basement. Even though this is a product for indoor use, it is potent. We had the little tiny window open with fans going and we still could smell it for a few days after. Fortunately one coat was enough.
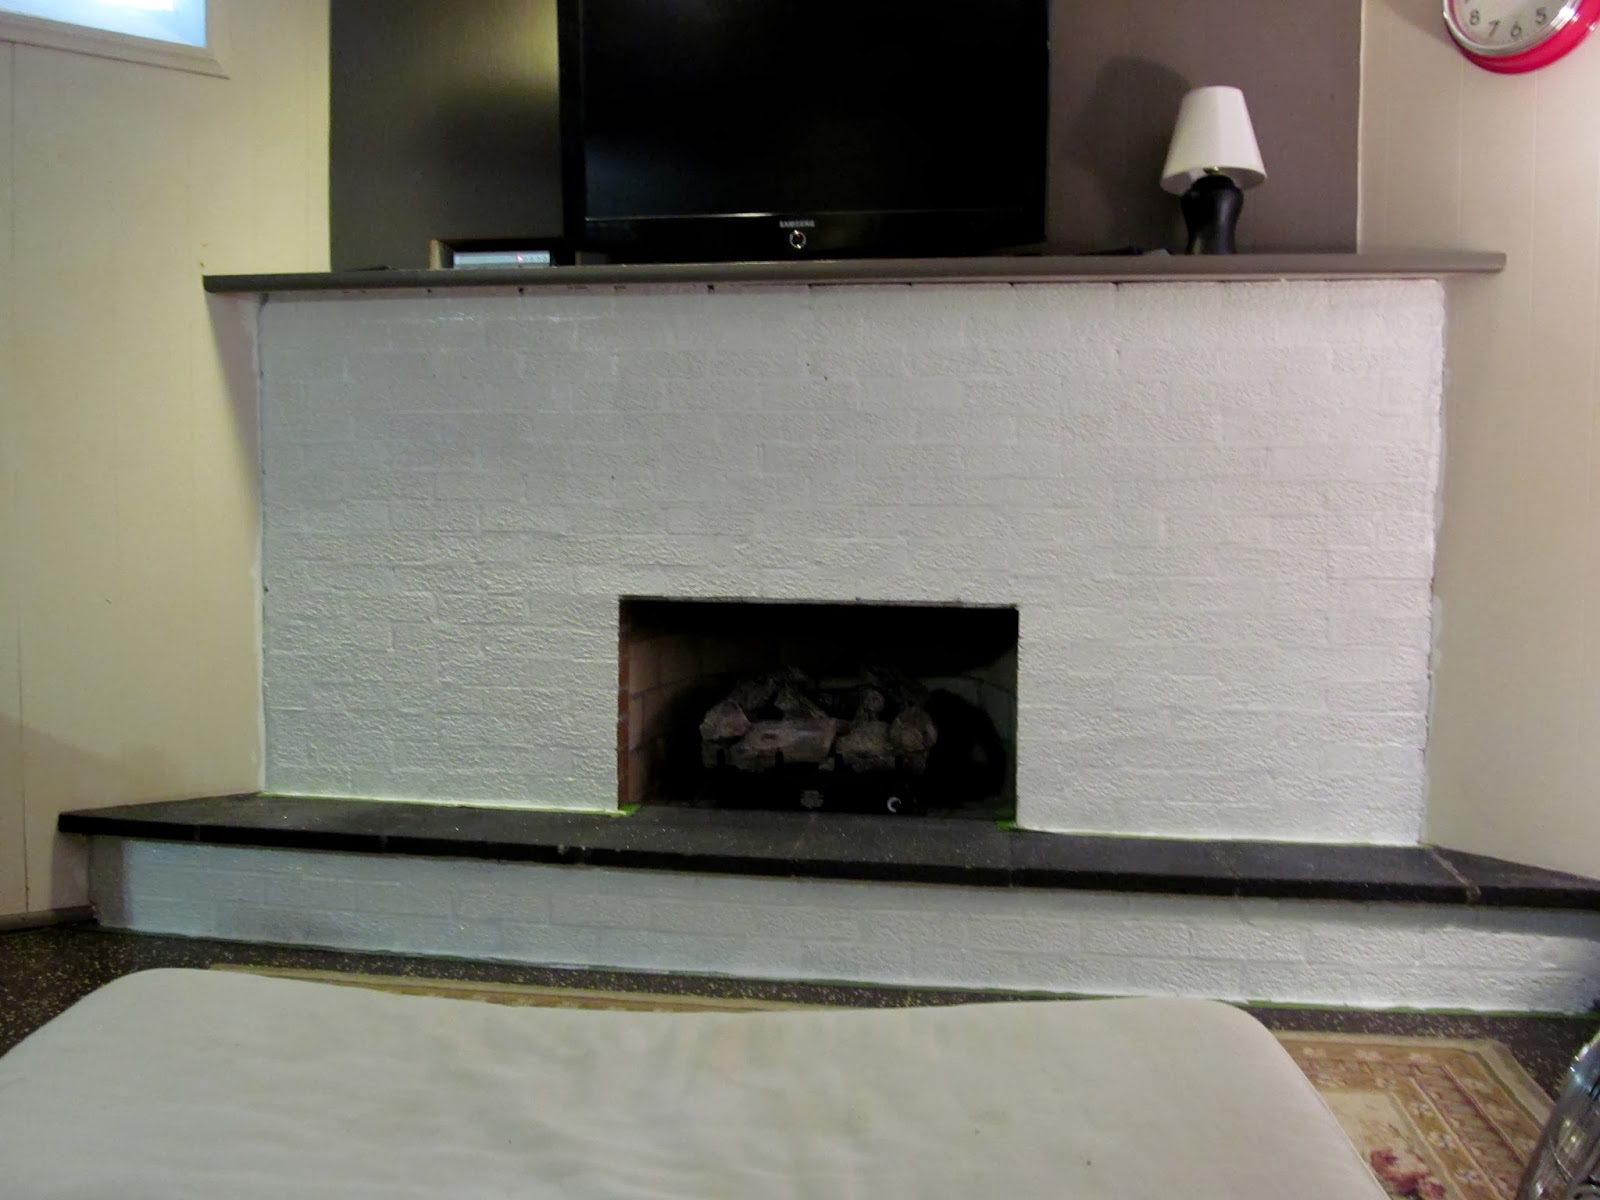

Oh - So much better looking already!


The whole space feels lighter already.


After the primer dried for a week, we were so ready to get the rest of the basement brightened up. 


Part of brightening up the place, Hero tackled an unexpected (on my part) job with the existing lighting. 

For whatever reason, there was a recessed light in a super awkward spot right in front of the fireplace wall. Not only was it thisclose to the TV, but it looked like a 6 1/2 watt bulb, it was so hidden up in the ceiling. (Take my word for it.) So Hero moved it to a better location and replaced it (and it's brother) with a much more efficient recessed light. Sorry, no photo of those.  But they are just like the ones in our kitchen.)

The problem I was in charge of fixing is how to patch the hole. 

Ugh.

I'm not a huge fan of the textured ceiling, but it is what we were working with. It actually wasn't as hard as I thought it would be. Once I gave up on the idea that it would match perfectly, I was free to be creative with the plaster patch stuff. 


It actually didn't turn out too bad. 

Good. Moving on.


See the gray spot on the ceiling just above Hero's right hand? That is the patched area. Once everything was painted it blended in just fine.

We decided to paint the entire place the same color. The fireplace, the ceiling, the walls and the trim. It is Bistro White (Valspar) and is the same color as the trim and ceilings in the rest of the house. 

We did flat for the ceiling, satin for the walls and fireplace and semi-gloss for the trim.

(You can see the old color on the right of the fireplace. Not the worst ever, but compared to the clean white, so drab. Not sure why we waited until actually painting that wall to take the clock down though.)


Between Hero and I, we had two trays going at all times. He usually does ceiling and I usually do trim. And we share the walls. We just kept rotating what we were doing and switching up trays, rollers and brushes. Amazingly we did not get anything mixed up.


We love it! It all looks so clean and bright. With everything the same color, the space really opens up. We needed that since there are so many different things going on - three slightly different ceiling heights, corner fireplace and a post right in the middle of the room.

After we got done painting, I swept and mopped and dusted. I washed the slipcovers on the couches. I sewed a few new pillow covers. I edited out some things and accessorized. We actually have stuff up on the walls, too, to make it feel much more "Murphy". 

Not too much stuff though.


Before.


And after.

We spend a lot more time down here now. It is so cozy with the fireplace - Hero hooked up the gas and it warms up so nice. And the couches are so comfy for snuggling and taking little naps.

For the cost of some paint and a few lights, we are really happy with the way our basement got a new look.

signature photo teresasig1.png

Tuesday, January 7, 2014

numbers

Remember this project? The one we started a million years ago? 

Well, it is now 96% done!


We had some touch up to take care of and painting the trim around the steps and a little bit of molding to add. This was the part of the project that took several weeks to finish up. I hate when that happens! But we just could not get to this sooner with so many people in the house, including a two year old.


But Alex, Lawson and Jett have their own place now, and it got wrapped up. 

Yay!

I was excited to do something fun with these steps, too. I got some of that other stuff done and out of the way - touch-up and trim painting - Take my word for it. You'll see it at the end here.


My friend Ellen and I purchased this set of stencils a million years ago and have used them for so many great projects. I used them on a pillow, on the bathroom wall in one house and on a dining room wall and a bedroom wall in another house. Ellen has used them lots of times, too. Great investment. (If you want to borrow them, just let me know!)

I knew they would be just what I needed for the steps.


I measured. Really. Usually when it comes to this kind of stuff, I just eyeball it. But I knew I needed to be pretty accurate for these or they would look all wonky.


And sometimes I measure with stuff other than a ruler. Sometimes I use a rubber stamp. It happened to be the right height.


These stencils work in a two-part system. It's great because it is easy to line up and there are no gaps, especially in letters and numbers with cut-outs.


Started with the left side. Or the right side. It's hard to tell with an eight.

I have had this set of stencil brushes for a million years, too. They are great for texture painting, and, of course, for stenciling.


See how cool that looks? 

I'm not too worried about that little tiny spot of paint there in the upper curve. Gives it a little character.


Getting ready to do the right/left side. The way it works is that you line up what you have already done with the outline on the second stencil. Genius!


Finishing up the eight. That line under the number is on the stencil. I just line that one up with the one I drew using the rubber stamp as a guide. Peace of cake.


And it is done!

I am in love. A little bit of sass to make you smile.

I had planned to run these numbers up the middle of the steps, but Brenden suggested the side. What a great idea - Just different enough.


See all the trim painted and all those crisp lines? So glad to have those crossed off the list, too. Hero just needs to get some trim pieces at the top and we can call this whole project complete.

Having these stairs done is pretty motivating to get cracking on the rest of the basement. Sounds like a good cold weather project to me. Hopefully it won't take a million years to finish.

signature photo teresasig1.png

Tuesday, October 15, 2013

Seriously, Plan F on the Stairs!

For a space that doesn't have any furniture or someplace we hang out, this stairway is sure getting lots of attention.

Here is where we left off:


And our latest idea was to not scrape and sand the steps and just cover them with plywood like we did the kitchen floor and then paint them and they would be terrific.

And so we got started on plan 6. Or F.


And then we discovered a little tiny super annoying problem:


We could not use just straight cut wood for the steps. There is a little notch on the front side edges on both sides of each one. 

Not sure why we didn't consider that when we thought up this genius plan. Except that maybe we were just too happy to have a plan that might actually work out.


Hero gave a valiant attempt to measure and hand cut a sample step to see  how challenging this new development would be. And it was a big pain in the neck. It's not like he can just make a template, cut them all the same and then install. Each one would have to be measured, then he would have to go out to the garage to cut, and then back down to fit them in place. And if it fight perfectly (highly unlikely) he could go on to the next one. 

Like I said, big pain in the neck.

Hero suggested we just take out the old boards and replace them.

Hahahaha!

And then we came back to reality.

After one step, Hero got out the plastic to seal off the area. 

He was ready to give it the old college try to scrape and sand the wood.


Ugh.


Here is a common scenario in our house with things like this:

I try to do something, say scrape ick and goo off the basements steps, and it takes FOREVER to make any progress. at. all.

Hero comes along, throws the scraper around and one step is done in like two minutes. Seriously.

So between the two of us, we got all eleven steps scraped and sanded. Good thing Hero had me to do a few of them.


Heavy duty sanding and scraping action.


Since no project is complete without at least one trip to the store, Hero ended up at Harbor Freight for more sandpaper. Not that he was sad about going to one of his favorite stores.


Now this is more like it! 

I just love that Hero cleans up.


Back to my specialty - Painting!

We decided on two colors with a runner down the center.


I painted the outside color first. Then taped off for the second color.

Painting stairs is a serious exercise in patience. It's not like you can just paint the whole stairway and be done. This kind of project really makes me twitchy.


Here is a trick I learned online with painting stripes on a painted surface. After taping, paint a quick layer of the very same color the new color is next to. That way, if there is any seeping under the tape, it is the same color and there should be very little touch-up. 


After that dries paint the new color. I had to do three coats of paint. One half at a time.

Patience.


And then the tape comes off. There is not anything much more satisfying than pulling the tape off and having an awesome perfect line.

Patience rewarded.


And painting the other side a few days later.


Ta-da!


There are a few little spots to touch up - No biggie. And there are a few spots that need a little caulk and then I need to paint the white trim along the stairs.

And then add something fun.

signature photo teresasig1.png

Friday, October 4, 2013

Progress and Some Ideas

We are working on that plan E for the stairs. It is going to sound a little bit like our kitchen floor, except different. But before we can actually address the step part of the stairs, we needed to do some prep work. 

It was probably a good idea that we did not know exactly how we wanted to go forward quite yet, as prep work is a weakness of mine. 

I am usually so impatient to get started on the part of the project that is just before the finished part.

I used to do things a little backward with projects - Starting in the middle and then having to go back to the beginning because the middle wasn't working out so good. 

Like painting a room - I would totally skip cleaning the area of cobwebs, and go right to painting. Then I would have to stop the painting, clean the brush of dust and cobwebs, clean the corners of dust and cobwebs, get a wet rag for cleaning my fingers, find some gloves, grab the tape to cover edges and get a drink of water and turn on some music.

And then get back to painting.

Hero has been working lots of overtime, so I have had to patiently wait on him to address the steps. And while I am waiting patiently, I am able to work out my impatience with prep work by doing the prep work while I wait. Make sense?


First, have to caulk those gaping cracks. Seriously. Having all that split molding just looks so unattended. It's not the end of the world that those gaps exist, but it is one of those little details that makes such a difference. And it is so easy to fix!


I just squirted that stuff in all the cracks. Piece of cake.


Looks gloppy at first - Don't worry about that. The middle usually looks not finished, because it's not.


Just run a finger along that bead of caulk and it smooths right out. It may need a swipe or two, but it is pretty darn forgiving. 

See how prepared I was? I wore gloves.


Here is how the steps look after they were vacuumed up. So ready to put this look behind us.


I pulled out the primer and got to work. I was hoping (as usual) that this particular project would only need one coat. I painted and painted and painted and when I got done with the first coat, I realized I would need two coats. Rats.

Good thing I am still being patient.


I was pretty pleased with myself that I remembered that if I painted each step all the way down, I would be stuck in the basement for a few hours.


A little tip about primer - It's stinky. There are warnings on the can to use in a well ventilated area, which this area was as much as it could be. Remember the stinky kitchen floor when we stained it?

Yep - I pulled out the candles again. They really work!


When the right side was dry enough to walk on, I got busy on the left side. At this point, Hero woke up (Remember Hero sleeps sometimes during the day because he stays up all night saving lives.)
and asked why I painted the step if we were going to cover it? That is a good question. I thought the same thing as I was painting them. 

You see, I thought our conversation went something like this:

Me - What can I do on the stairs while you sleep all day long?
Hero - Prime everything.
Me - Great idea! I will get right on that.

But Hero probably thought the conversation went more like this:

Me - What can I do on the stairs while you sleep all day long?
Hero - Prime the parts that need to be painted. Don't worry about the step part because we are going to cover that.
Me - I hate priming.


And that is why the steps look like this from this view. 

With the candles.

So that is how it looks in the middle of the project. Not necessarily better looking, but really it is, because it is progress.

Our plan is to cover the step part with the same plywood that we used for the kitchen floor. There simply is no hope for those steps the way there are - Remember they are about 55 years old and have seen plenty of action. Those two layers of linoleum we removed were only a small part of their history.

But we are not going to stain the stairs like we did the kitchen. Since we choose not to paint the kitchen floor at all, we thought the stairs would be the perfect place to do something fun with a painted floor. Here are some inspiration photos we are thinking are pretty darn clever:

cool

Grey & Teal painted stairs for basement

Simple paint design idea for basement stairs.

Three blue stripes in middle of painted white stairs in seaside cottage,

Pretty neat, right?

The thing is with this space, we feel like we can be a little more clever ourselves. As I think about all the changes we have made in the stairwell, I feel like I am channeling all those who lived here before me. They took the opportunity to do something they thought was clever in this little area, and now it's our turn.

Maybe someday in the future, when we are long gone, someone will wonder what the heck we were thinking, too.

But so far, we are liking the plan E.

signature photo teresasig1.png